This CLANNAD Windows 7 theme consist Nagisa and Kyou, and to use this theme is abit different with previous Kusugawa Sasara 7 theme, so please read carefully below. This theme was create by wudahht. If you want to see Kyou theme look like please proceed to here.

As alway it is require to use the Universal Theme Pacther before using this theme. For your information, this theme will be able to use in 64bit ^^. This theme got folder background which you can see on the 1st image above, but its do not change the start menu button, control panel background and etc like in Kusugawa Sasara 7 theme does.
To Get Started
- Download the Windows Theme Installer.
- Download this theme via below link.
- Backup a copy of this 'ExplorerFrame.dll' file via 'C:\Windows\System32\ExplorerFrame.dll'.
- Must already patch with the Universal Theme Patcher.
Same as previous few theme, it is require go through a installation, and it is good thing to do the installation because it will be less configure require, although still require some. If you haven't use any Universal Theme Patcher or if when you use the theme your Windows 7 only change the wallpaper (and start menu did not has any changes) then go to here for information.
- First, extract the file you downloaded, you will see 2 file & 2 folder, execute the 'CLANNAD Windows7Theme-by wudahht.exe'.
- A windows pop up and select English language and continue.
- Follow the installation instruction, until u reach the 'License
Agreement'.

- In the 'License Agreement', please highlight the password and copy it (refer to above image), and then continue.
- Then just paste the password you just copy on the next step, then
continue until you at the 'Select Components' step which will ask you to
select some option, like wallpaper size and so on.

- You just has to ignore the 'Sogou Skin' option
(unless you are using it), and select a wallpaper size, then continue
again until you reach Finish step.
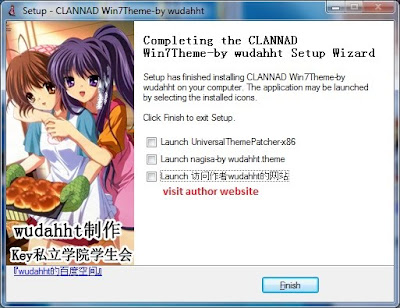
- In the final step (refer to above image), you will see 3 option. If you haven't use any Universal Theme Patcher, then only enable that option, or via here to read how to use it. Then select finish and you are done.
- You can change the theme via the 'Control Panel > Appearance and Personalization > Personalization'.


Windows Theme Installer & Folder Background
To enable the background image of the folder, you require to overwrite a file call 'ExplorerFrame.dll' file which can be find under System32 folder or this path 'C:\Windows\System32\ExplorerFrame.dll'. In normal cases, you are unable to make a modification even you take the ownership of the file, because the file itself is running. To do so, you are require to download a program call Windows Theme Installer, I use this to overwrite this file, there might have other program to do the same thing too. Before you do anything, it is good to make a restore point or do any important backup, I am not guarantee that your system will not crash, not stable after using some of this program, so please use it at your own risk ^^.
- Download this Windows Theme Installer, and then install it into your Windows 7.
- Before continue, please remember to backup a copy of the 'ExplorerFrame.dll' file in case it is require if anything happen.
- Open the Windows Theme Installer program, then enable the
'ExplorerFrame.dll' option, then Select on the browse to select the
appropriate file inside the theme file you downloaded.

- If you are 32bits then select the file in the 32 folder, if you are
64bits then go to the 64 folder. To tell you the truth, I only tested
under 32bits system, so not sure 64bits is working or not, not working
then I dunno.
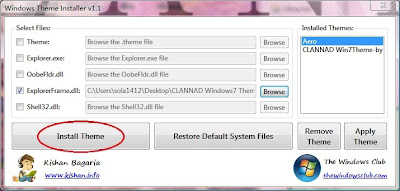
- After select the file, press the 'Install Theme' button, and it will
overwrite the file for you, and ask you to restart system. Just restart
it.
- And now it is done. Actually before restart you should able to see the background folder. If you can't see anything, it is high chance that you did not use any Universal Theme Patcher or other issue. Other issue I don't know.


I'm not sure it is require to alway restore the 'ExplorerFrame.dll' or not, so do it at your own risk ^^, but if not mistaken it is only require to do it once just like the Theme Patcher, correct me if I'm wrong.
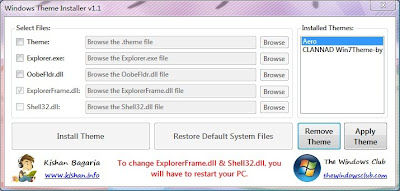
- Open the Windows Theme Installer program again.
- Press the 'Restore Default System Files' button to restore the file.

- Then follow the instruction of the program, and so it is done ^^.
- If any error occur and you can't restore back the
'ExplorerFrame.dll' file, you can overwrite the 'ExplorerFrame.dll' file
using the backup 'ExplorerFrame.dll' file you do in the early step.
Source : http://modvisc.blogspot.com/2010/09/nagisa-kyou-from-clannad-series-windows.html